By Jenn Milner
The demand for wider spans brings new challenges to less-experienced builders. While it may be tempting to think “a truss is a truss”, each application has its own nuances and limitations. And in the case of longer trusses, the involvement of a registered design professional (RDP) is essential.
Engineering

No matter which material you choose, each truss is engineered specifically for the building. Length and width are a unique number to each project, but other forces are also taken into consideration. “All trusses are designed to meet local loads and codes,” says Warren Bott of Worldwide Steel Buildings. “It could have to withstand 90 mph winds or 180 mph winds.” Elements to the north are also a big factor. “In some Northern US locations, ground snow loads may exceed 50 pounds, which could become the controlling design consideration for steel trusses,” says Kent Mason, Northern Region Sales Manager for Varco Pruden.
All of these forces are engineered into the truss and can affect the shape, webbing, and weight of the finished product. Installation techniques then, can change significantly from project to project. All of the information needed for correct installation is shown on the truss drawing, so pay close attention. “You need to follow the plans so the truss is installed as designed,” says Bret Buelo of Wick Buildings. “One of the most critical things is having a crew that can follow the plans. If you’re not putting in the right number of bolts in the right locations at the support column, then you’re taking a risk with the strength of the building.”
One of the most important aspects of the drawings are instructions for temporary and permanent bracing, which are vital for overall stability and can vary from project to project. “As for installation,” says Steve Wozney of Starwood Rafters, “most of the builders are capable of doing it. Mainly where they run into trouble is not following the proper bracing instructions in the installation process.”
For both metal and wood trusses, bracing will take place on three planes: the top chord plane, the bottom chord plane, and the webbing plane. While the trusses are being hoisted and installed, temporary bracing is necessary to keep everything in place. The top and bottom chord planes will typically need lateral bracing with at least 8-foot long 2 x 4s to maintain spacing. The lateral brace is nailed at each cross-section of the truss. During installation, diagonal bracing along the webbing plane should be nailed to the narrow sides of the webbing, crossing a minimum of three trusses to prevent lateral movement (domino effect). If more than one lateral brace is needed to connect all trusses, boards should overlap by at least two trusses. After all bracing is complete, bracing along the top chord will be removed and replaced with sheathing.
“Bracing is very important, and even more so when it comes to larger spans,” says Wick engineer Adam Kraus. “More things can get out of plane. Until you get the steel skin on, which provides a lot of rigidity to the structure, a truss is just a lot of sticks hanging in the air.” The engineered specifications will provide bracing guidance, so trusses don’t suffer lateral bending or completely domino while you’re trying to get them in place.
Installation
Any time you are hoisting heavy objects in the air with a crane, there is room for danger, but the sheer size and weight of wide-span trusses call for extra care. Some bad practices that builders might get away with when installing a smaller span (like lifting a truss from just the peak or center) can cause real damage when trusses are 60 plus feet wide. “Different equipment and erection techniques are necessary when installing wider steel trusses. Using an experienced erector familiar with truss installation and OSHA requirements are key considerations,” says Mason.
The first consideration is lifting the trusses from the storage site. When they arrive, trusses should be placed somewhere where they will only have to be moved once. “Lifting the trusses needs to be thought about well ahead of time,” says Kraus, “finding a space on site for such large trusses where there is space to maneuver, and no obstacles is important.”
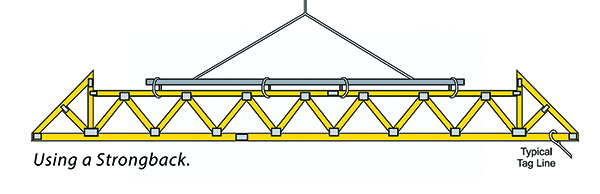
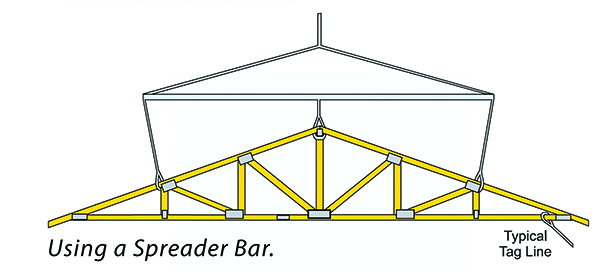
In general, the larger the truss, the more secure pick points should be used to lift it. Multiple pick points ensure the pressure of the lift is distributed evenly across the truss, avoiding excessive lateral strain on the trusses. In trusses up to thirty feet, two evenly spaced points along the top chord of the truss will suffice, but above that, spreader bars or other stabilizing methods should be used.
According to the Building Component Safety Information (BCSI) guide, 30- to 60-foot trusses should be hoisted with a spreader bar above the truss with a minimum of three lines that slope inward. For trusses above 60 feet, “use a spreader bar two-thirds to three-quarters of the truss length positioned at or above mid-height of the truss. Attach the spreader bar to the top chords and webs at 10-foot intervals.” So, if you have an 80-foot truss, you will likely have six pick points along a spreader bar, 10 feet apart. Bundles of trusses can be lifted without the use of a spreader bar, as trusses are sturdier when bundled together.
The best way to enter into a wide-span project is with someone who has done it before. An experienced contractor can tell you where problems crop up and the best methods for getting the whole team to work together with the truss plan. The bigger the truss, the more room for error, so demand attention to detail from everyone. “You need to have good truss engineering and a company that can translate the process to the crew with a good set of plans,” says Buelo. “You want to make sure your technique is right or you’re putting the crew at risk.”